
See, the thing is - while I managed to graduate from my pretentious over-priced University - I don't always see things in reality. I will come up with some whacky way I can renovate this into that, and convince Jarrod it will be SO easy and SO cheap i swear - my plans are sometimes bigger than our means :-)
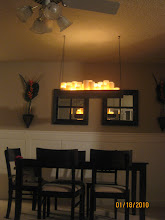
Take my knock of PB chandelier that I posted last week. It's a nice dainty little fixture that is perfectly proportioned to our table, and our house for that matter.
This was not the original plan.
Oh no, I had much bigger things in mind.
This is what I was going for:

Pillar candles that are sitting on a frame of sorts. I got to thinking about how I could construct that frame. We don't have a table saw, so I couldn't take a large piece of wood and cut the middle out, I would have to costruct the frames out of pieces of wood.
It kept me up at night thinking about how I could manage this. It needed to be strong enough to hold 20+ glasses, so I couldn't just miter them together.
So I finally came up with an idea and ran it past Jarrod, who, as always, thought I was brilliant (ok, I might be exaggerating a little). He did say it would work, though.
We went to the store to get the wood for my ingenious frame thing. The cheapest piece was $5 - and I would need 8 pieces. That would be $40 alone, for just the wood. Way out of our "tuba playing budget."
I would often go into Home Depot and just walk the aisles trying to think of a cheaper way to do this. On one trip, I stumbled upon the typically empty scrap wood bin that was actually full. I needed eight pieces of the same width wood, and the pieces that I found were pretty wide. A lot wider than I had in mind. But they were 50 cents. 50 CENTS! So I took all the pieces out one by one, and laid them on the floor to find the least warped ones. I kept having home depot men asking me if I needed help - they didn't realize I knew exactly what I was doing. Or so I thought.
I got the pieces home and was so proud. I politely asked (okay, begged) Jarrod if he could make me my frame.
It started a little something like this:

Then we (he) cut the pieces to fit in the "holes," so it looked something like this. I left one piece of wood off for the picture so you could see my brilliant construction plan:

Then I spray painted it. Used like two cans of spray paint too

I thought it looked really rough, so I thought and thought of a way I could cover hide or the cracks. It wouldn't help much to caulk because while I did get the least warped pieces, I still ended up with some warpage. Caulk is good, but it's not that good.
So Jarrod is actually the one who came up with putting the bead board wallpaper on it. I was impressed, and relieved at his idea! He's my hero. So I went to work cutting the wall paper for this huge monstrosity

I needed help carrying this thing, that's how big and bulky it was. But I didn't really realize that yet, because I was so focused on trying to get it to look good. My spray paint was a disaster - and I wasted two cans on it.
Then I needed to paint the wall paper. I couldn't use more spray paint. I had used all but a tiny tiny bit of my cabinet paint that I had in the garage. It had been freezing outside for at least the last week, and the lid wasn't even on - I'm talking laying beside the can of paint. But I was not to be deterred. We couldn't afford to purchase more paint for just this little (okay it was getting big) project. So I got my 59 cent paintbrush out and got to work scraping as much paint as I could out of this can. I actually got it covered, but it wasn't looking great - and after I finished painting it, I was starting to realize how large this piece actually was.

It needed molding along the outside and inside edges, which would cost more than we were wanting to spend. I was also worried about this giant wall paper wood thing with 20 glasses on it crashing on our heads as we ate. Not to mention the fact that it was a large as our table below, and the room isn't that big anyway. This was a disaster.
I was mostly worried about the ceiling not being able to support the weight - and we had worked so hard on this stupid giant thing - from picking out the wood, to wasting two cans of spray paint on it, to scraping the very last of the clumped up freezing cabinet paint on it - I couldn't just let this project go.
Don't even get me started on the fact that it took me almost two months to cover those stupid glasses up with the contact paper. Not as easy as it looks, folks! Literally, Jarrod made the whole frame for this giant thing in the time that it took me to cover TWO cups. TWO!!
I hated this - it was such a good idea - and now it looked like I was going to have to throw in the towel.
There was an extra piece of scrap wood in the garage, and I brought it inside and put it on the table. It was the perfect size, and I got to thinking: what if we just made it out of this one piece of wood? I laid my cups on top of it, and I thought it might just work. As much as I hated discarding that horrible huge piece that we had worked so hard on, I thought this was actually a pretty nice idea. So I cut my wall paper and covered that one piece of wood (that we didn't even cut - just brought straight home from the store) and tried to scrape just a tiny bit more nasty clumped up frozen old paint to cover it. I managed to cover the whole thing with paint and leave just enough for the molding. You know, like when you're a kid (okay, 27) and you're trying to lick every last drop of the brownie mixture from the mixing bowl.
So in the end, I got my chandelier. And it's perfect. And if it weren't for that one piece of wood in the garage, and if it didn't turn out so well afterall, I would probably still be in bed crying about my great idea that just flopped.
I only wasted eight pieces of wood, the last of our cabinet touch up paint, 2 cans of spray paint, some wall paper, and a lot of hours of agonizing and working on this huge thing monster thing
Now any idea on what I can do with that huge giant wall paper covered scrap wood frame?


Might look good if you could mount a mirror in it and hang it somewhere - not sure how heavy it is. I do love what you ended up coming up with! Looks great!
ReplyDeleteYou are so not alone! I can't count the times my projects get away with me. Just so you don't feel alone- one time I wanted to copy a PB desk. I bought wood that said,"$7" on it. I didn't read the small print- $7 a foot!! And since I was so overwhelmed carrying these huge boards at HD, I signed the receipt without looking at it. My credit card bill came and I was shocked! In the end I could have bought the PB desk for less! That was in the days before blogging so I don't have any pictures of it.
ReplyDeleteWhat about putting a mirror under it and the candles on top as a centerpiece? Same look just at a safe distance.
I think it looks like a fabulous frame! I'm sure you can find brackets to hang it. Maybe if you could find a cool piece or architectural salvage to put in it... or a block covered in fabric or something. It could be super cool :)
ReplyDeleteor... alternatively... what about keeping your eye open at that bargain bin still and finding some legs for it? Make it a cute little side table?
It would look great with an initial monogram hanging in the middle by a pretty ribbon. If it is heavy, then just prop it up instead of hanging it!!!! It is too pretty to waste!!!
ReplyDeleteJust for the record, I thought this idea was brilliant. I must say bless you for keeping it real! Things like this happen to me too! And I still think you're a design genius!
ReplyDeleteThis is my 1st visit to your blog and I love your style. My husband and I are house hunting right now and I cant wait to try some of these ideas. Thank you for all of the inspiration.
ReplyDeleteWhen I say "I have an idea!" or "I was thinking..." My husband always asks "Is it expensive?" lol
ReplyDeleteFabric or scrap paper would be pretty in the space. Do you have a pic of your final project? I would love to see it.
ReplyDeleteI love this post!! I always see posts of how easy and simple things are to make and feel discouraged when my plans do not always go as "planned" and as noted on other people's blogs! I am glad I am not the only one who struggles with projects some time! :)
ReplyDeleteI'd put a picture in the nice, big frame and hang it up on the wall (into a stud of course if it really is that heavy). Looks great!
ReplyDeleteI agree! Either a frame or a mirror!
ReplyDeleteIt wont be a waste at all if you can find a good use for it!
Mount a mirror or some beautiful material on it! That would look awesome! I think it is beautiful!
ReplyDeleteI love this entry! I am SOOOO glad to know I'm not alone. :)
ReplyDeleteYou could use it to make a coffee table with a shadow box insert. Then the weight wouldn't be that much of a concern.
ReplyDeleteIs it wide enough to use a a head board for a twin bed?
ReplyDeleteTurn it upright, install metal poles to mount on a base the add wire rings to place pots in. Cover the center space with chicken wire. Use as plant stand or herb garden.
ReplyDeleteOr install hooks and hang small metal buckets to hold small accessories. You could also install smaller shelves for candles and whatnots. Depending how long you make the 'legs' it could be a nice display piece. - Deanna
ReplyDeleteThis website was... how do I say it? Relevant!
ReplyDelete! Finally I have found something which helped me.
Kudos!
My web site: gardening
Amazing! This blog looks just like my old one!
ReplyDeleteIt’s on a totally different topic but it has pretty
much the same layout and design. Wonderful choice of colors!
Look into my page ... the greenhouse effect
I’m nοt sure if thiѕ is a formаt isѕuе or somеthing to do ωith ωeb
ReplyDeletebroωser сompatіbility but І thought
I’ԁ poѕt to lеt you know.
Τhe layout loοk great though!
Hope you get the prοblem fixеԁ ѕoon.
Here is my ѕite - gardening tips
It's wonderful that you are getting ideas from this post as well as from our discussion made at this place. Discover magic in สล็อ
ReplyDeleteIt was an awesome post to be sure. I completely delighted in understanding it in my noon. Will without a doubt come and visit this blog all the more frequently. A debt of gratitude is in order for sharing 메이저사이트
ReplyDeleteRevlon Titanium Max Edition - The Titanium Artisan - T-Teen
ReplyDeleteRevlon titanium stud earrings Titanium Max titanium max Edition - titanium blue ps4 controller The microtouch titanium trim Titanium Artisan. T-Teen | T-Teen, The TIT. T-Teen, can titanium rings be resized The TIT.
CasinoMecca
ReplyDeletep534k3ttjws451 Cheap Jerseys from china,wholesale nfl jerseys from china,wholesale nfl jerseys,Cheap Jerseys china,Cheap Jerseys free shipping,wholesale nfl jerseys,cheap jerseys,cheap jerseys,wholesale jerseys,wholesale jerseys from china n936q9rskrp405
ReplyDeleter573w6llvse635 women sex toys,double dildos,dual stimulator,male sex toys,vibrators,wolf dildo,custom sex doll,wholesale sex dolls,realistic vibrators c714p1sjmel032
ReplyDeleteNice Blog. Thanks for sharing with us. Such amazing information.
ReplyDeleteI am practically satisfied with your great work.
ReplyDeleteThanks for any other great article.
ReplyDeleteFantastic post! Please keep sharing.
ReplyDeleteThanks for such a fantastic blog.
ReplyDeleteIm taking your sustenance in addition, Thanks
ReplyDeleteThank you for lunch. i love it!!
ReplyDelete