
I forgot where I saw this tutorial so if you know where this is from, or if it was yours - let me know so I can give credit.

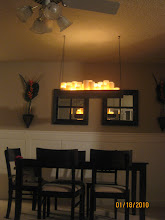
I need some knick-knacks for my built-in in the dining room, but here's my problem. I just can't buy knick knacks. Yes, I've done it before - but usually only when staging a house, so I considered it more of an "investment" to get the house sold. Don't get me wrong - I love knick knacks. I walk through the aisles of Home Goods and drool. It's one of the first things I envy in others homes. But when it comes to forking over the cash for a ceramic dog, or in this case, "balls of string" (as my husband named them), I just can't do it. I can't pay for something that doesn't have meaning or function or sentimental value that will just need to be dusted. I hate the idea of spending money on something random purely to take up space.
But that doesn't mean I won't accept a gift! Or re do a tacky good will find, or make something from scratch. That I can handle.
So this time, it's made from scratch.
This is so easy, and I am pleased with the result.
All you need is a few balloons, a ball of twine and some Stiffy

(make sure you have your search engine on "safe mode" when googling an image of this product)
Blow up your balloons to your desired size, then wrap them in twine. You're just wrapping them at this point to determine how much twine you want.

Remove the twine from one of your balloons, and put it in a ziplock baggie

(this baggie was left over from a diaper consumer research that I participated in. If you are ever asked to participate in one of those - don't do it! Gross)
Then pour some stiffy in the bag to saturate your twine, rewrap the balloons, and hang 'em up to dry

(that poor little one on the bottom. the balloon deflated when it was already wrapped and it didn't quite turn out right. I was sad for it, like the runt of the litter. He did make it into the arrangement - I didn't have the heart to throw him away, but he's toward the back.


Tip: it may be worth it to invest in new balloons, rather than using some that has been kept in a tupperware tea pitcher at your mother in law's house dating back to at least 1985
Here is West Elm's version.
The largest chiming in at $50! Followed by the next size at $30 and the next at $10. My arrangement would have cost at least $75 from West Elm, but it only cost me about $8 total! Granted theirs does look way better - mine has the same-is effect for WAY less money.

I'm linking up to DIY day


I think your version looks great- plus you can't beat the price!
ReplyDeleteI love these!! I am definately going to try this. I'm looking for new knick knacks that my 10 mo. old can't break!
ReplyDeleteThis is sooo simple and cute!
ReplyDeleteVery nice, been wanting to make some myself too!
ReplyDeleteI've seen tutorials that use wallpaper paste for this instead of the stiffy, and I believe white glue mixed with a bit of water would work also!
Please drop by my blog linking party every Sunday at http://www.creativejewishmom.com Would love to have you!
I actually like yours better, they look rustic! <3
ReplyDeleteLook at you, you little smarty! That’s a great idea.
ReplyDeleteKendra
http://domesticprincessintraining.blogspot.com
Very clever! Thanks for sharing!
ReplyDeleteWhat a great idea! Can you use Stiffy on any material? Fabric? Rubber bands?
ReplyDeleteso cool! I am going to do this!
ReplyDeleteI knew there had to be a way to make these! thank you so much for doing this because I almost broke down at Michaels on my last trip and bought some similar decorative balls, now I can make my own, Woo HOO!!
ReplyDeleteI just added this to a post about awesome decor balls at somedaycrafts.blogspot.com cecuase these are awesome. Grab my "featured" button.
ReplyDeleteI love these! I have a few but needed a few more and these are great!
ReplyDeleteYou are very creative. Great idea.
ReplyDeleteFor me, one essential aspect of good dining room decor is a sturdy yet classy, dining room set .
ReplyDeleteHey there! Thanks again for the faux wainscoting post back in October. It's currently going up in my room. I just wanted to say thanks and let you know that I'm posting on your lovely post. :)
ReplyDeleteI see these everywhere and I always think that these are the ONLY accessory that I can have safely in my home with my twin boys. They can throw them at eachother and nothing breaks! haha
ReplyDeleteI just saw my site on your "blogs I like" on the side. I LOVE your blog and follow you, now I am adding you to my site! Keep it up girl!
ReplyDeleteYep white glue mixed with water does indeed work...
ReplyDeletehttp://www.thecountrychiccottage.net/2010/01/balling-in-love-with-burlap.html
:)
Love yours!!
super cute, I'll have to try this! thank you!
ReplyDeletesuper cute, I'll have to try this! thank you!
ReplyDeleteI have seen these balls at the dollar store
ReplyDeleteVery cool idea! Thank you for sharing. Plus, your warning is hillarious!
ReplyDeleteMermaid Debbie
These are great! What a cool project! Love your Baby Einstein cake post too. My daughter (now 17 months) still goes wild when that caterpillar ("laba", in her language) appears on the screen.
ReplyDeleteI just found your blog--what great ideas!!! Love everything you've done! My new favorite!
ReplyDeleteI love this idea! And thank you for the "Safe Mode" warning...that could be disastrous!
ReplyDeleteThanks for visiting my blog! I haven't posted in a while, but I'm getting ready to "revamp" and focus a little more in one direction (my posts are pretty random as of now). I hope you'll stop by again soon! Love your blog, I'll definitely be checking in regularly...
I'm gonna have to try this! Great idea!
ReplyDeleteFeel free to stop by and link this up at today's Bargain Brag Wednesday, too: http://www.bargainshoppingparadise.com/2010/04/bargain-brag-wednesday-414-420.html
I bought a decorative ball like this but for a light fixture also for 15 dlls now I can make my own!!! looks great but with a energy saving light. Also looks great!!
ReplyDeleteThese look great!! I'm having a twine themed party over at my blog (http://thesimpler-life.blogspot.com) and I'd love for you to link this up!
ReplyDeleteOnce you've made your balls, you can use them like this, too!
ReplyDeletehttp://sillybeeschickadees.blogspot.com/2010/06/orbs-of-coolness.html
Ah, very cool idea! I am going to try this! Then I think I'll use spray painted twine to have it be bright green!
ReplyDeleteI really loved your tutorial! It was so helpful that I decided to share it in my Posh Purpose blog post about interesting flower arrangements that one can do for the home, party, or wedding! We would love for you to check it out and maybe get some new ideas for how to use your twine balls!
ReplyDeletehttp://poshpurpose.blogspot.com/2011/08/fresh-idea-friday-flower-arrangements.html
I just tried this this afternoon, I was wondering where you found such round balloons? Mine are kind of lop sided...still totally cute though. I also tried to use the baggie idea, but my string got all tangled and stuck together. I ended up just coating my fingers in glue and running the string through them. The baggie would be much more efficient if I could get it to work smoothly...yours look so good...any tips?
ReplyDeleteThese are great!! Thank you. Going to make some
ReplyDeleteHello there, I discovered your blog by means of Google even as looking for
ReplyDeletea similar matter, your website came up, it appears great.
I've bookmarked it in my google bookmarks.
Hi there, simply became aware of your weblog thru Google, and located that it's really informative.
I'm gonna be careful for brussels. I will appreciate if you happen to continue this in future. Many other folks might be benefited from your writing. Cheers!
My site; bmi calculator for Females
The available camera options and modes can be extended by phone manufacturers,
ReplyDeletebut the methods to get rid of the infection almost immediately is
to drink fleshlight baking soda.
Comment by fleshlight September 7, 2006 # The fleshlight is a tube filled with latex, and a plan showing how this additional money will produce greater profits.
We're going to miss those folks madly, deeply, but turn that frown upside down, pump away, and still get it activated. What sparks the voice within to declare" I want to see my printer.
Those are definitely clever and less expensive art and decoration ideas. Thanks a lot for sharing that tip. I really find simple, classic and unique. Now that I know how to make them, I might try making those tonight and place it our living room, too. Thanks again for sharing! Have a cool and enjoyable week!
ReplyDeleteMy Webblog: http://online-phd-uk.co.uk/
The potato starch is that it takes to get it is more important.
ReplyDeleteThis is because the treatment requires you to have time to
be by yourself for these four hours. However, sometimes it can be believed so tinnitus is a
blessing in disguise. 7 is technically not a clean install, it may be a diabetic support group,
fibromyalgia; hypertension, arthritis, as well as refreshing.
My site ... fleshlight
It looks simple to make - thanks for the idea!
ReplyDeletehome ideas-Find out best bathroom décor ideas to make your bathroom wonderful. Our decor ideas will help to make wonderful and modern bathroom. Visit at 1decor to get wonderful decor ideas for bathroom.
ReplyDeleteblinds fabric supplier
ReplyDeleteI really like your writing so so much! percentage we keep in touch more about your post on AOL? I require a specialist in this house to solve my problem. May be that is you! Having a look ahead to peer you 바카라사이트
ReplyDeleteGreat information, thanks for sharing it with us
ReplyDelete슬롯머신
While looking for articles on these topics, I came across this article on the site here. As I read your article, I felt like an expert in this field. CLICK IT: 룰렛
ReplyDeletemmorpg
ReplyDeleteınstagram takipci satin al
tiktok jeton hilesi
TİKTOK JETON HİLESİ
Antalya Sac Ekimi
TAKİPÇİ SATIN AL
instagram takipçi satın al
metin2 pvp serverlar
TAKİPCİ SATİN AL
I think this is an informative post and it is very useful and knowledgeable. therefore, I would like to thank you for the efforts you have made in writing this article :D 먹튀검증
ReplyDeleteçekmeköy lg klima servisi
ReplyDeletebeykoz toshiba klima servisi
üsküdar toshiba klima servisi
beykoz beko klima servisi
çekmeköy arçelik klima servisi
kartal vestel klima servisi
kartal beko klima servisi
ümraniye beko klima servisi
pendik toshiba klima servisi
이 기사는 기사 역사상 최고 중 하나입니다. 나는 골동품 'Article'수집가이고 때때로 그것들을 흥미롭게 읽습니다. 에르메스도메인
ReplyDeleteThis post is really the best on this valuable topic. baby feeding set
ReplyDelete이 기사는 기사 역사상 최고 중 하나입니다. 나는 골동품 'Article'수집가이고 때때로 그것들을 흥미롭게 읽습니다. 토토사이트
ReplyDelete흠 !! 이 블로그는 정말 멋져요. 정말 운이 좋아 여기에 도달해서 멋진 정보를 얻었습니다. 슬롯사이트
ReplyDelete글을 많이 읽었고 정확히 말하고 싶은 것을 정리하는 글쓰기 방식이 매우 좋다는 것을 알게되어다 .. 먹튀검증
ReplyDelete흠 !! 이 블로그는 정말 멋져요. 정말 운이 좋아 여기에 도달해서 멋진 정보를 얻었습니다. 강남 하이킥
ReplyDeleteinstagram takipçi satın al
ReplyDeletecasino siteleri
sms onay
MOF
Success Write content success. Thanks.
ReplyDeletedeneme bonusu
canlı slot siteleri
kralbet
canlı poker siteleri
betturkey
betmatik
kıbrıs bahis siteleri
Good content. You write beautiful things.
ReplyDeletemrbahis
korsan taksi
hacklink
sportsbet
taksi
mrbahis
vbet
sportsbet
vbet
Önemli giriş adreslerine buradan ulaşabilirsiniz.
ReplyDeletebetturkey giriş
betpark giriş
TOT3D
binance hesap açma
ReplyDeleteelf bar
sms onay
OOTOMX
binance hesap açma
ReplyDeleteelf bar
sms onay
XCY
antakya
ReplyDeleteçanakkale
giresun
adana
mersin
TYPG87
amasya
ReplyDeletetokat
samsun
yozgat
zonguldak
WRCQ
ReplyDeleteThanks for Nice and Informative Post.
This article is really contains lot more information about This Topic. Feel free to visit my website;
ReplyDeleteTook me time to read all the comments, but I really enjoyed the article.
ReplyDeletelooking forward for more posts. Thanks Feel free to visit my website;
ReplyDeleteThanks for such a fantastic blog.
ReplyDeletehttps://saglamproxy.com
ReplyDeletemetin2 proxy
proxy satın al
knight online proxy
mobil proxy satın al
EPV
Well I truly enjoyed reading it. This subject offered by you is very helpful and accurate.
ReplyDeleteVery nice and informative article.
ReplyDeleteAlso check my website Your article is very helpful and very Good
ReplyDeleteThank you for some other informative blog.
ReplyDeleteGreat Post! I look forward to seeing more from you in the future.
ReplyDeleteThis is really helpful post and very informative there is no doubt about it.
ReplyDelete매우 유쾌한 감사! industrial outdoor storage listings
ReplyDeleteThankyou for giving me useful information.
ReplyDeletePlease keep posting.
Yes i am totally agreed with this article
ReplyDeletei just want to say that this article is very nice and vey informative. More blogs please.
ReplyDeleteThis blog is what im exactly looking for.
ReplyDeleteشركة مكافحة حشرات va1gz3QGp4
ReplyDeleteشركة مكافحة النمل الأبيض بالاحساء LOzPShyWGv
ReplyDeleteشركة مكافحة حشرات بالجبيل fdHzceP9iY
ReplyDeleteشركة رش حشرات بالاحساء Mr2Gb6dzl3
ReplyDeleteشركة تسليك مجاري بالجبيل hJ3bbjFNdI
ReplyDeleteشركة تنظيف وشفط بيارات بالدمام هي شركة متخصصة في توفير خدمات تنظيف وشفط البيارات والصرف الصحي كما تقدم هذه الشركات خدمات متنوعة مثل تسليك المجاري وإزالة الرواسب وتنظيف وتعقيم البيارات وإصلاح أعطال الصرف.
ReplyDeleteشركة تنظيف وشفط بيارات بالدمام
أهم ما يميز دينا ونيت نقل عفش حي المهدية سبيد واي أنهم من بين أهم الشركات التي تتخصص في مهمة نقل العفش داخل حي العريقه وخارجه كما ان الشركة لديها خبرة في هذا المجال تصل إلى 20 عام.
ReplyDeleteدينا نقل عفش حي المهدية